
What to Do in the 2 Weeks Before Your Color Appointment
The standard advice about preparing for a color appointment covers about 48 hours. Don't wash your hair the morning of, bring photos, show up with clean-ish hair. That's it. That's most of what's published.
The problem is that some of the variables affecting your color outcome start two weeks before you sit in that chair. If you had a keratin treatment last week, or if you deep-conditioned your hair the night before, or if you've been using a silicone-heavy leave-in every other day, you've changed the conditions your colorist will be working with - and not in their favor. Not knowing this doesn't make the result worse because the colorist didn't try hard enough. It makes it worse because the prep window is real, and nobody explains it.
Here's the complete picture.
Two Weeks Before: The Treatment Pause Window
Two weeks out is when you stop certain treatments. Specifically, protein treatments and keratin services.
Protein treatments create a coating on the hair shaft that, in excess, causes what colorists call protein overload. The hair becomes brittle, stiff, and resistant to further treatment adhesion - including color. A heavy protein mask applied the week before a color service can create uneven porosity across the same head of hair, which means inconsistent color uptake: patchy results, ends that read differently from roots, or color that won't hold at all in over-treated sections.
Keratin treatments are a more specific concern. If you have a keratin service done recently - within the past two to three weeks - the treatment seals the cuticle with a keratin-formaldehyde bond (or its formaldehyde-free equivalent). Color applied over a freshly sealed cuticle struggles to penetrate. The result is color that sits on the surface rather than inside the hair shaft, fades faster, and may lift unevenly. The ideal order for any client who wants both services is color first, keratin second. If you've already had the keratin, wait a minimum of two to three weeks before coloring. Different keratin formulas have different waiting period requirements - confirm the specific window with whoever administered your keratin treatment.
This is particularly relevant in Los Angeles, where keratin treatments and Brazilian blowouts have been standard in high-volume salons for years. If you're a regular keratin client, the timing relationship between your two appointments matters more than most prep guides acknowledge.
One Week Before: The Product Clearance Window
One week before your appointment, start clearing out the product buildup on your hair.
Silicone-based conditioners and heavy oil treatments coat the hair cuticle with a hydrophobic layer that blocks color molecules from penetrating the shaft. This includes most "shine serum" products, some leave-in conditioners with dimethicone or cyclopentasiloxane high on the ingredient list, and any product marketed as a "hair oil treatment." The coating they create is effective for smoothing and frizz control - that's exactly why they're popular. But that same effectiveness makes them a barrier to color absorption.
One week of avoiding these products, combined with your regular shampoo routine, is enough to reduce the buildup to a level that won't interfere. You don't need to strip your hair aggressively. You just need to stop adding more barrier. Our guide to shampoo ingredients that are bad for color-treated hair explains which products to reach for between now and your appointment date.
48 to 72 Hours Before: The Wash Question
You've probably heard "don't wash your hair before a color appointment." The actual guidance is more specific: wash your hair 24 to 48 hours before the appointment. Not the morning of. Not a week before.
Here's why the timing matters. Natural scalp oil (sebum) builds up on the hair shaft over 24 to 48 hours of no washing. That oil coating provides a protective barrier between the scalp and developer during color application, reducing chemical irritation. It also keeps the hair in the slightly textured state that allows color to distribute more evenly than it would on freshly clarified hair.
If you have oily hair, a 24-hour window is sufficient. If your hair is naturally dry or if your scalp is on the lower end of sebum production, 48 to 72 hours gives you more of that protective coating without the hair feeling unwashed.
What you don't want: a fresh wash the morning of (removes protective oils, leaves hair too clean and potentially sensitized) or hair that hasn't been washed in a week (product buildup, excess oil that impedes even penetration). The 24 to 48 hour range hits the useful middle.
The Day Before: A Short Checklist
The day before your appointment, run through these:
- No dry shampoo. Dry shampoo coats the hair shaft with starch particles and can interfere with color penetration even more than natural oil does. If your hair needs it, use it earlier in the week and make sure it's fully removed by your last wash before the appointment.
- No hairspray, gel, or styling cream. These create surface barriers that prevent even application. If you're doing anything the night before, a light leave-in that rinses out is fine. Heavy styling products are not.
- Deep conditioning masks: skip tonight. A deep conditioning mask applied within 48 hours of coloring creates exactly the kind of coating the silicone products do - a temporary barrier that hinders color absorption. Save the mask for after the service, when your hair will actually need it.
- Patch test: if you're seeing a new colorist, trying a substantially different formula from your last service, or if you've had any skin sensitivity reactions in the past, do a patch test today. Apply a small amount of the dye formula behind your ear or in the crook of your elbow, leave it 48 hours, and check for redness, itching, or swelling. The California Board of Barbering and Cosmetology does not require patch testing, but professional industry guidance from brands like Schwarzkopf recommends it prior to every color application - especially for first-time services or new formulas.
The Day Of: What to Bring, What to Wear, What to Say
Arrive with your hair in its natural, unstyled state. No blowout, no curling, no braiding. Your colorist needs to see your actual texture, porosity, and natural color in the conditions they'll be working with. Arriving with a fresh blowout or elaborate style tells them nothing useful and adds a step.
Wear loose clothing with a wide neckline or an old shirt you're not worried about. Color gets on collars and necklines. It also sometimes drips. Wear something you'd be fine throwing in a bleach wash or discarding.
Have a light meal before longer appointments. A balayage, a full color correction, or an all-over lightening service can run 3 to 5 hours. Arriving hungry makes a long sit significantly more uncomfortable.
Bring your inspiration photos - 3 to 5 images that show the result you're after. Choose photos on hair texture and density similar to yours where possible. Be honest with yourself about what's been filtered or lit artificially. A useful photo shows what the color actually looks like in natural daylight, not what it looks like under studio lights with a cooling filter applied. For a detailed breakdown of how to evaluate those photos honestly, see our piece on reading a colorist's Instagram portfolio before booking.
The Disclosure Conversation
Before the colorist applies anything, they should be asking you about your hair history. If they don't ask, offer it. Your colorist needs to know:
- Every permanent or semi-permanent color application in the past two to three years, including box dye. Box dyes contain metallic salts that can react unpredictably with professional lightener - creating uneven lift, discoloration, or hair damage that neither of you will see coming if the history isn't disclosed. "I only did box dye once" still counts.
- Any bleach or lightening treatments, salon-applied or at home.
- Relaxers, texturizers, or chemical straightening services.
- Any keratin or gloss treatment in the past 30 days.
- Scalp sensitivity or allergic reactions to hair products.
- Current medications. Some medications affect how the scalp reacts to developer and how the hair holds tone. Your colorist needs this information to formulate safely. You don't have to explain the medical reason - naming the medication is enough.
Clients sometimes hold this back because they're embarrassed about box dye, or worried the colorist will judge them for it. They won't. Most colorists have seen everything. But working without that information creates real risk - for your hair and for the result you're paying for.
Inspiration Photos: What Makes One Useful vs. Useless
A useful inspiration photo shows hair in natural light, with a texture reasonably close to yours, and reflects a result achievable for your starting point. Bring photos where you can actually see the color - not just a glamorous styled shot where you're drawn to the look overall.
Photos that set up unrealistic expectations: anything heavily filtered (cool-toned, high-contrast, near-white blonde on what is clearly lifted hair), anything taken in direct studio light that flattens warmth and adds dimension artificially, and anything where the "before" is clearly very light or already salon-processed and you're comparing it to a dark or damaged starting point.
Bring the photos as a reference for direction, not as a contract. The colorist's job is to get you as close to the spirit of that reference as is healthy and realistic for your specific hair today. If there's a real gap between the photo and what's achievable in your first session, you need to know that before the bleach goes on - not during it. That's a conversation worth having at consultation, not mid-process.
If you're wondering whether the colorist you've booked is right for your specific hair type, review our checklist on how to find the right colorist for your hair type in LA before the appointment. And if you're comparing studios for your first visit, the Hair Color LA ranked studio comparison is a useful starting point.
A Two-Week Prep Overview
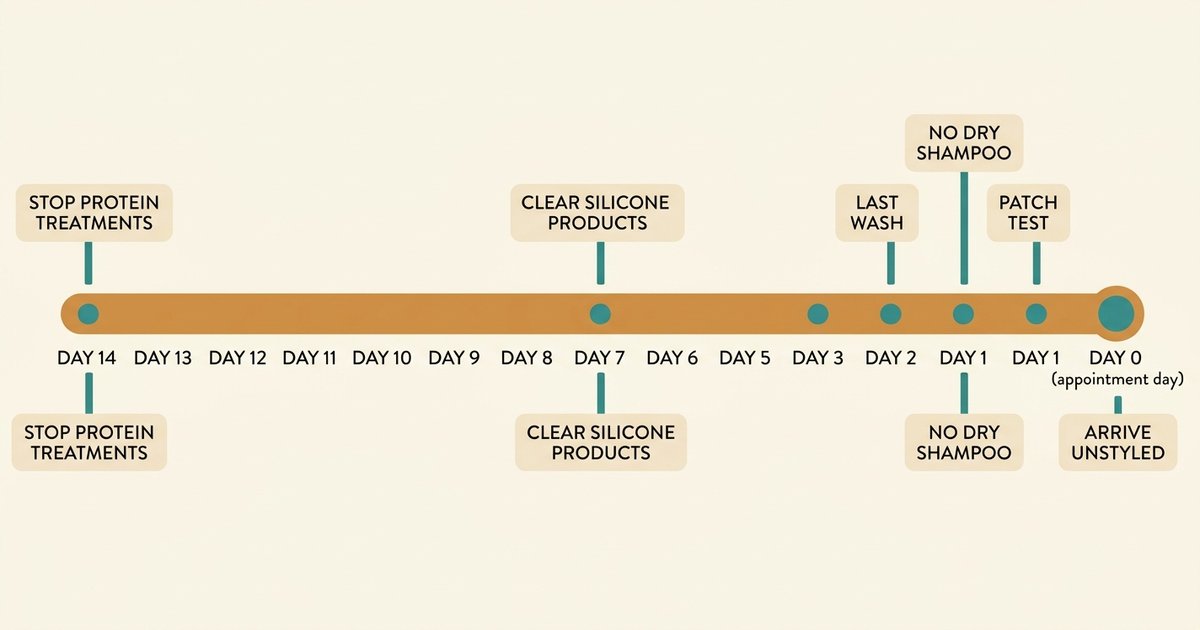
- Two weeks out: Stop protein treatments. Schedule keratin services (if needed) for after your color appointment. Note your chemical history so you can report it accurately.
- One week out: Stop silicone-heavy conditioners and oil treatments. Continue your normal wash routine.
- 48 to 72 hours out: Do your last wash. Let sebum build naturally from here.
- Day before: No dry shampoo, no styling products, no deep conditioning mask. Do a patch test if applicable.
- Day of: Arrive unstyled, in old clothes with a wide neckline. Eat first. Bring 3 to 5 inspiration photos. Have your full chemical history ready to discuss.
After your appointment, caring for the result correctly is just as important as preparing for it. Our guide to protecting color-treated hair through LA summers covers the post-service maintenance routine that keeps the work your colorist did looking its best.